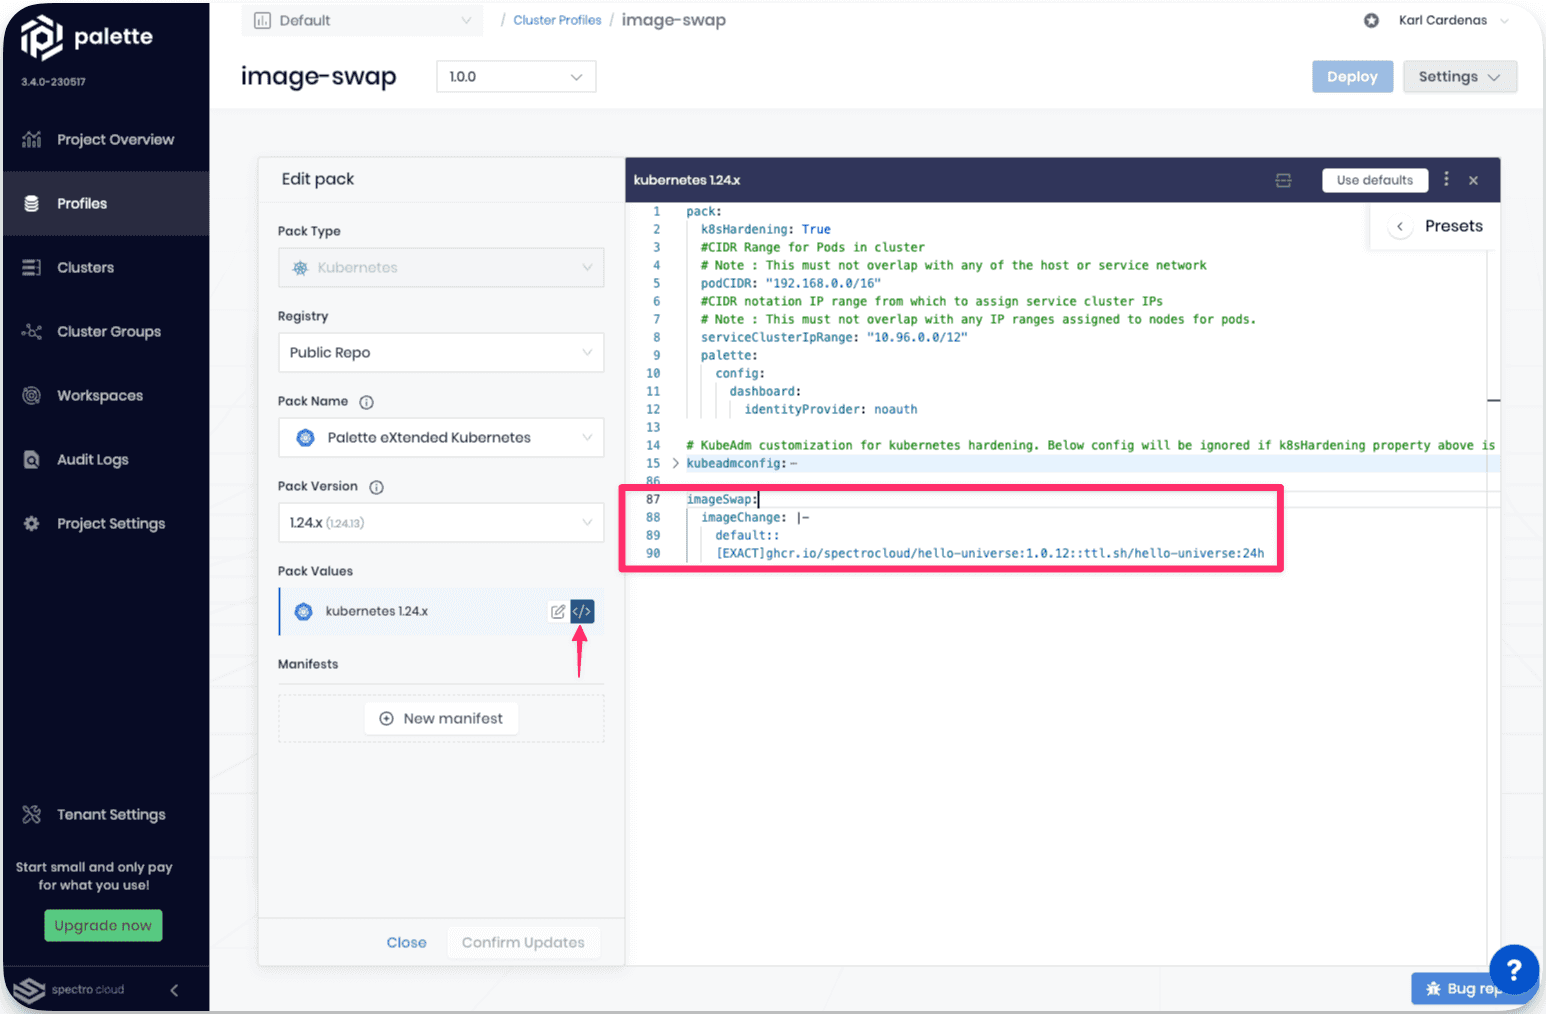
Image Swap
Palette supports swapping out images and registries at the Kubernetes layer. Palette uses the ImageSwap webhook that is exposed by the ImageSwap Mutating Admission Controller for Kubernetes. You can use this feature to override a specific number of container image registries or particular images. The following are some common use cases for image swapping:
- Avoid rate limit issues encountered with public images by pointing to an alternate image registry that caches public images. This is more common in an Enterprise setting.
- Changing the URL of an internal or external container registry.
Support air-gapped environments by redirecting public image requests to an internal registry.
To use the image swap feature, specify an image swap configuration in the Kubernetes pack YAML. The
imageSwapblock must be its own node, meaning that it's a standalone block at the root level of the YAML.imageSwap:
imageChange: |-
default:
# your custom configuration goes here
You can add the imageSwap section when you create the cluster profile or at cluster deployment. You can customize the image swap functionality several ways. We recommend you review the official Image Swap configuration documentation to learn more. To help you get started, the following are some common configuration patterns.
The default::entry specifies the default configuration for all images. The :: delimiter is used to separate different elements of the configuration.
Configuration Examples
Override a Specific Registry
In this example, image swapping is disabled for all registries except for example.private.io. All image requests for example.private.io will be swapped for harbor.internal.example.com.
imageSwap:
 imageChange: |-
     default::
     example.private.io::harbor.internal.example.com
Apply a Global Swap with an Exception
Enable image swapping for all registries except example.private.io. All image requests for example.private.io will not get swapped. All other image requests will get swapped to harbor.internal.example.com.
imageSwap:
  imageChange: |-
    default::harbor.internal.example.com
    example.private.io::
Swap a Specific Image
Swap out a specific image. The image example.private.io/demo:v1.0.0 will be swapped with gcr.io/google-samples/hello-app:1.0. The syntax format is [EXACT]<source-image>::<target-image>.
imageSwap:
  imageChange: |-
    default::
    [EXACT]example.private.io/demo:v1.0.0::gcr.io/google-samples/hello-app:1.0
Replace Image Path
Replace an image path with a custom registry. All image requests that start with ghcr.io/example* will get swapped with example.private.io.
imageSwap:
  imageChange: |-
    default::
    [REPLACE]ghcr.io/example*::example.private.io
If the registry or image mentioned in the image swap configuration cannot be located, Kubernetes will try to obtain the image from the source mentioned in the deployment configuration.
The examples provided are intended to help you get started. Refer to the official Image Swap configuration for more examples and information.
Image Swap with Palette
Use the following steps to learn how to use Palette's image swap functionality.
Prerequisites
- Kubernetes 1.19.0 or greater.
- Palette v3.4.0 or greater.
Swap Image
- Log in to Palette.
- Navigate to the left Main Menu and select Profiles.
- Click on Add Cluster Profile.
- Fill out the input fields for Name, Description, Type and Tags. Select the type Full and click on Next.
- Select your infrastructure provider and click on Next.
- Complete the Operating System (OS) layer by selecting Registry, Pack Name, and Pack Version. Click on Next layer to continue.
- Select a Kubernetes distribution and version.
Next, select the code editor button </> to edit the pack YAML configuration. Within the
packsection's scope, add yourimageSwapconfiguration block. Click on Next layer to continue.
- Complete the remainder of the cluster profile creation wizard.
- Deploy a host cluster and use the cluster profile containing the image swap functionality. Check out the Deploy a Cluster tutorial for additional guidance in deploying a host cluster.
Validate
You can validate that the image swap is functioning correctly by using the following steps.
- Log in to Palette.
- Navigate to the left Main Menu and select Clusters.
- Select the host cluster you deployed with the image swap functionality.
- Download the kubeconfig file to access the cluster. Refer to the Access Cluster with CLI guide for detailed steps.
Review the deployment configuration of a workload using a registry or image impacted by the image swap configuration. Verify the image or registry is swapped to the expected configuration value you provided in the image swap configuration block.
You can use the following command to verify the correct image and registry of the deployment. Change the
REPLACE_MEvalue with the correct values from your environment.kubectl get deployment REPLACE_ME \
--namespace REPLACE_ME -o=jsonpath='{.spec.template.spec.containers[0].image}'tipUse the command
kubectl get deployments --all-namespacesto list all deployments in the cluster.