VMware vSphere Airgap Instructions
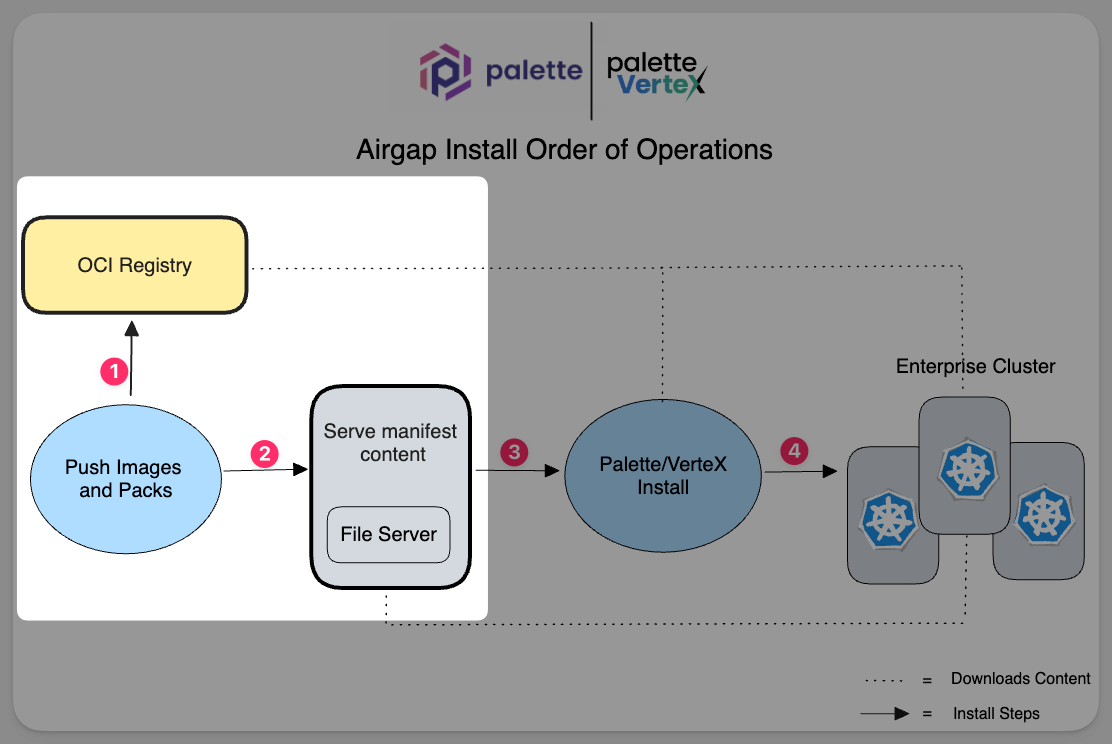
This guide provides instructions for preparing your airgap environment for a Palette VerteX installation, by ensuring you complete all the required preparatory steps 1 and 2 shown in the diagram. The installation process is covered in the respective installation guides for each platform.
Prepare Airgap Installation
Use the following steps to prepare your airgap environment for a VerteX installation.
Carefully review the prerequisites section before proceeding. This will save you time and frustration. Each prerequisite is required for a successful installation.
Prerequisites
- An x86 Linux jumpbox or bastion host with connectivity to the target platform where you are installing VerteX.
30 GB of disk space available for the airgap setup binary and temporary files. The uncompressed airgap content is approximately 20 GB.
An OCI registry such as Harbor or AWS ECR to store VerteX images and packages. The OCI registry must be accessible from the VMware vSphere environment. We have verified the installation against Harbor and AWS ECR. Other OCI registries may work but have not been tested.
cautionEnsure the OCI registries are set up with HTTPS. AWS ECR is enabled with HTTPS by default. Harbor requires you to enable HTTPS. If you are using Harbor, you must enable HTTPS to authenticate with the registry. Refer to the Harbor documentation for guidance.
An HTTP file server to host the VerteX manifest. The file server must be accessible from the target environment where VerteX will be installed. Below is a list of common HTTP file servers:
cautionTake the necessary steps to secure your file server and ensure it can automatically recover from a failure. The file server is a critical component of the airgap installation and must be available post-install for VerteX to function properly.
- jq - Command-line JSON processor installed and available. Refer to the jq download page for guidance.
To interact with the OCI registry, you must have the following tools installed and available.
AWS CLI v2 - Required for AWS ECR.
Oras CLI v1.0.0 - This version is explicitly required for the setup script.
zip - required for the setup script.
unzip - or equivalent for extracting the manifest content from the airgap setup binary.
- Palette CLI installed and available. Refer to the Palette CLI Install page for guidance.
- Review the required vSphere permissions. Ensure you have created the proper custom roles and zone tags. Zone tagging is required for dynamic storage allocation across fault domains when provisioning workloads that require persistent storage. Refer to Zone Tagging for information.
Self-hosted VerteX installations provide a system Private Cloud Gateway (PCG) out-of-the-box and typically do not require a separate, user-installed PCG. However, you can create additional PCGs as needed to support provisioning into remote data centers that do not have a direct incoming connection to VerteX. To learn how to install a PCG on VMware, check out the VMware guide.
Instructions
Complete the following steps before deploying the airgap VerteX installation.
- Log in to your vCenter environment.
- Create a vSphere VM and Template folder with the name
spectro-templates. Ensure this folder is accessible by the user account you will use to deploy the airgap VerteX installation.
Use the URL below to import the Operating System and Kubernetes distribution OVA required for the install. Place the OVA in the
spectro-templatesfolder. Refer to the Import Items to a Content Library guide for information about importing an OVA in vCenter.https://vmwaregoldenimage-console.s3.us-east-2.amazonaws.com/u-2004-0-k-12510-fips.ovaAppend an
r_prefix to the OVA name after the import. For example,r_u-2004-0-k-12510-fips.ova. This prefix is required for the install process to identify the OVA. Refer to the Supplement Packs page for a list of additional OVAs you can download and upload to your vCenter environment.
In your OCI registry, create a repository with the name
spectro-packsand ensure the repository is private. This repository will host the VerteX Packs.- Refer to the Create Projects guide for information about creating a repository in Harbor.
- Refer to the Create a repository guide for information about creating a repository in AWS ECR.
In your OCI registry, create another repository with the name
spectro-imagesand ensure the repository is public. The repositry will host VerteX images.
- Download the Certificate Authority (CA) for your OCI registry. You will need to provide the CA during the installation process. Otherwise, you may encounter errors when authenticating with the OCI registry, which could result in an incomplete install.
- Log in to the Linux environment where you will download the airgap binaries and complete the remaining steps, including the VerteX installation.
Authenticate with your OCI registry and acquire credentials to both repositories you created earlier. You will need these credentials when deploying the airgap VerteX installation.
- Harbor
- AWS ECR
Use
orasto log in to your OCI registry. Replace the values below with your environment configuration values. Check out the oras login documentation for information about additional CLI flags and examples.oras login X.X.X.X --user 'yourUserNameHere' --password 'yourPasswordHere'If you are using a Harbor registry with a self-signed certificate, you will need to add the
--insecureflag to theorascommand.oras login X.X.X.X --insecure --user 'yourUserNameHere' --password 'yourPasswordHere'You can acquire the AWS ECR authentication command from the AWS ECR console. From the ECR repository details page, click on the View push commands button to access the command. Refer to the AWS ECR Authentication documentation for more information.
Below is the command you will use to authenticate to AWS ECR. The output of the
awscommand is passed toorasto authenticate with the ECR registry. Replace the values below with your environment configuration values.aws ecr get-login-password --region xxxxx | oras login --username AWS --password-stdin 1234567890.dkr.ecr.us-east-1.amazonaws.comFor the public image repository, use the
dockerCLI instead of usingoras. Replace the values below with your environment configuration values.aws ecr-public get-login-password --region xxxxx | docker login --username AWS --password-stdin public.ecr.aws/xxxxxxxtipBe aware of the timeout period for the authentication token. The process of uploading images and packages to the OCI registry can take a approximately an hour. If the authentication token expires, you will need to re-authenticate to the OCI registry and restart the upload process.
The airgap setup binary requires a set of environment variables to be available and populated. The environment variables will be different depending on the OCI registry you are using. Select the OCI registry and populate the environment variables accordingly.
- Harbor
- AWS ECR
OCI_IMAGE_REGISTRY: The IP address or domain name of the OCI registry.OCI_PACK_BASE: The namespace or repository name that hosts the VerteX Packs.OCI_PACK_REGISTRY: The IP address or domain name of the OCI registry.OCI_IMAGE_BASE: The namespace or repository name that hosts the VerteX images.export OCI_IMAGE_REGISTRY=<harbor-endpoint>
export OCI_PACK_BASE=spectro-packs
export OCI_PACK_REGISTRY=<harbor-endpoint>
export OCI_IMAGE_BASE=spectro-imagesExample
export OCI_IMAGE_REGISTRY=example.internal.com
export OCI_PACK_BASE=spectro-packs
export OCI_PACK_REGISTRY=10.10.100.48
export OCI_IMAGE_BASE=spectro-images
ECR_IMAGE_REGISTRY: The IP address or domain name of the public OCI registry for images.ECR_IMAGE_BASE: The namespace or repository name that hosts the VerteX images.ECR_IMAGE_REGISTRY_REGION: The AWS region where the ECR registry is located.ECR_PACK_BASE: The namespace or repository name that hosts the VerteX Packs.ECR_PACK_REGISTRY: The IP address or domain name of the OCI registry.ECR_PACK_REGISTRY_REGION: The AWS region where the ECR registry is located.export ECR_IMAGE_REGISTRY=<ecr-endpoint>
export ECR_IMAGE_BASE=spectro-images
export ECR_IMAGE_REGISTRY_REGION=us-east-1
export ECR_PACK_REGISTRY=<ecr-endpoint>
export ECR_PACK_BASE=spectro-packs
export ECR_PACK_REGISTRY_REGION=us-east-1Example
export ECR_IMAGE_REGISTRY=public.ecr.aws/1234567890
export ECR_IMAGE_BASE=spectro-images
export ECR_IMAGE_REGISTRY_REGION=us-east-1
export ECR_PACK_REGISTRY=123456789.dkr.ecr.us-east-1.amazonaws.com
export ECR_PACK_BASE=spectro-packs
export ECR_PACK_REGISTRY_REGION=us-east-1
Download the airgap setup binary. Replace the placeholder values in the commands below with the recommended version and credentials that our support team provides.
VERSION=4.1.6curl --user XXXXX:YYYYYYY https://software-private.spectrocloud.com/airgap-fips/$VERSION/airgap-fips-v$VERSION.bin \
--output airgap-fips-v$VERSION.binUpdate the airgap setup binary permissions to allow execution. Replace the file name below with the name of the airgap setup binary you downloaded.
chmod +x airgap-fips-v$VERSION.binStart the airgap setup binary. Replace the file name below with the name of the airgap setup binary you downloaded.
./airgap-fips-v$VERSION.binUpon completion, a success message will be displayed. The output is condensed for brevity.
Verifying archive integrity...  100%   MD5 checksums are OK. All good.
Uncompressing Airgap Setup - Version 4.0.17  100%
Setting up Packs
- Pushing Pack cni-calico:3.25.1
...
Setting up Images
- Pushing image docker.io/kindest/kindnetd:v20230227-15197099
- Pushing image gcr.io/cloud-provider-vsphere/cpi/release/manager:v1.22.8
.....
Preparing Manifests Archive
Manifests are available in /tmp/spectro-manifests-1696971110.zip. Extract the archive to a file server to serve as a Spectro Cloud Repository
Setup CompletedinfoIf you encounter an error during the airgap setup process, verify the required environment variables are set and populated correctly. If you are still having issues, reach out to our support team for assistance.
Move the manifest file located in your temporary directory to the location of your file server. Unzip the manifest file to a folder accessible by the file server. Replace the file name below with the name of the manifest file provided to you by the airgap setup.
unzip spectro-manifests-XXXXXXXXXXXX.zip -d /target/foldertipIf you want to get started quickly with a file server, install Caddy or use Python3's http sever and issue one of the following commands in the folder where you unzipped the manifest content. Each command will start a file server on port 2015.
caddy file-server --listen :2015 --browsepython3 -m http.server 2015We do not recommend serving the manifest content over HTTP, but it is an option if you want to get started quickly. For production workloads, enable HTTPS on your file server.
- Review the additional packs available for download. The supplemental packs are optional and not required for a successful installation. However, to create cluster profiles you may require several of the packs available for download. Refer to the Additional Packs resource for a list of available packs.
Once you select the packs you want to install, download the pack binaries and start the binary to initiate the upload process.
In the example below, the
airgap-fips-pack-amazon-linux-eks-1.0.0.binbinary is downloaded and started.chmod +x airgap-fips-pack-amazon-linux-eks-1.0.0.bin && \
./airgap-fips-pack-amazon-linux-eks-1.0.0.binVerifying archive integrity... 100% MD5 checksums are OK. All good.
Uncompressing Airgap Pack - amazon-linux-eks Version 4.0.17 100%
Setting up Packs
- Pushing Pack amazon-linux-eks:1.0.0
Setup CompletedRepeat step 16 for each pack you want to install.
You now have completed the preparation steps for an airgap installation. Check out the Validate section to ensure the airgap setup process completed successfully.
Validate
Use the following steps to validate the airgap setup process completed successfully.
- Log in to your OCI registry and verify the VerteX images and packs are available.
Verify the manifest file is accessible from the file server. The manifest file is required for the VerteX installation process. The screenshot below is an example of a file server hosting the unzipped manifest content. The example is using Caddy as the file server.
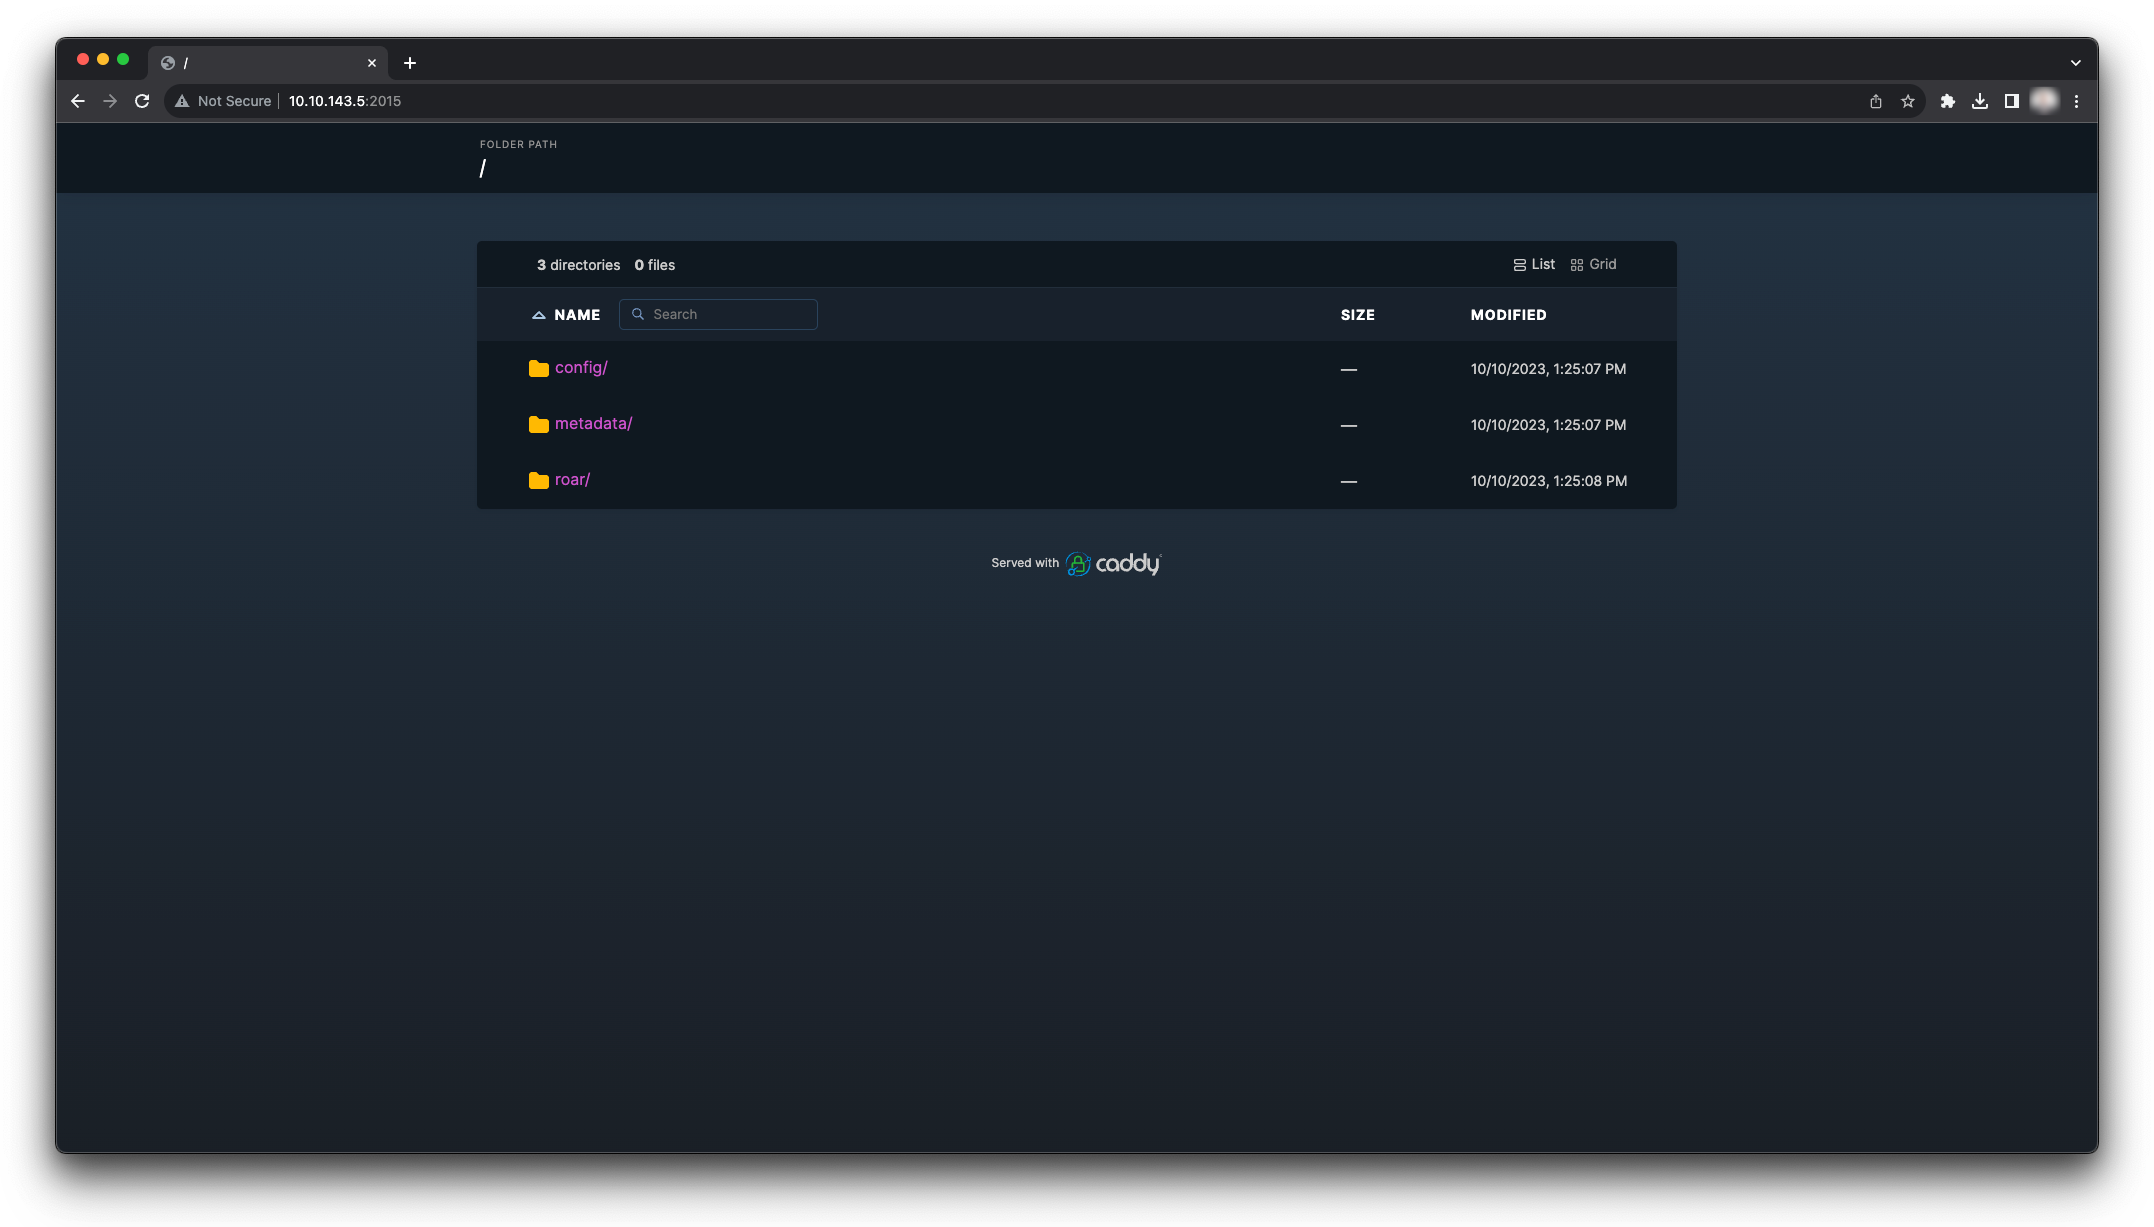
Ensure your file server is accessible from the environment in which you are installing VerteX. Use the following command to verify the manifest content is accessible from the file server. Replace the hostname or IP address below with your file server hostname or IP address.
curl http://<hostname>:<port>/roar/nickfury/versions.yamlversions:
- version: "3.3"
filepath: "/roar/nickfury/3.3/version.yaml"
patchVersionsFilepath: "/roar/nickfury/3.3/versions.yaml"
- version: "3.4"
filepath: "/roar/nickfury/3.4/version.yaml"
patchVersionsFilepath: "/roar/nickfury/3.4/versions.yaml"
- version: "4.0"
filepath: "/roar/nickfury/4.0/version.yaml"
patchVersionsFilepath: "/roar/nickfury/4.0/versions.yaml"
Next Steps
You are now ready to deploy the airgap VerteX installation. You will specify your OCI registry and file server during the installation process. Refer to the VMware Install Instructions guide for detailed guidance on installing VerteX.